Most lab owners buy a crate, drop a blanket inside, and call the job done. Two weeks later the floor under the crate smells like a kennel and the blanket is in three pieces. The crate was never the problem. The missing pieces are the layer under it and the bed beside it.
I set up an elevated dog bed for large labs and a waterproof crate liner as one station, and it took about 40 minutes from opening the boxes to a puppy sleeping in it. That station has held up for two very different dogs in my house: Duke, 75 pounds of black lab who chews first and asks questions later, and Penny, an 11-year-old rescue with hip dysplasia who needs a soft landing when she stands up.
This is the order I do it in, the measurements I take before I spend anything, and the mistakes that cost me money before I learned better.
Why you should trust me
Ten years as a trainer, most of it with hunting labs and obedience dogs, and now I write about beds full time. I have put more than 40 beds under Duke and Penny, and I keep a notebook with foam sink depths, cover failures, and chew timelines. My rule is simple: I do not recommend a bed I have not lived with for at least a month.
Duke is my durability test. If a material survives him for a year, it survives almost anything. Penny is my comfort test. Her hips tell me more about foam density than any spec sheet does. When I say something works for a lab, it passed both of them, not just the marketing copy.
How I picked and how I tested
Two things drive everything I recommend for a lab: the chew timeline and the wash cycle.
The chew timeline is how long a material lasts against a determined lab, measured in weeks, not years. Anything with a zipper, a plush cover, or a loose seam has a short timeline. Anything that survives Duke for a year has a long one. The shark phase, which for labs runs to about age three, is when the timeline matters most.
The wash cycle matters because puppies pee and seniors have accidents. A cover that dies in the washing machine on the third wash is a cover that failed. In my notebook, zippers die first, then the seam tape, then the fabric itself. If a bed's cover cannot take 20 washes, it is not a bed for a lab household.
For this setup I checked one more thing: whether the size claim is honest. The word large means nothing on a label. I measure nose to tail and add 12 inches. Duke measures 38 inches nose to tail, so I want at least a 50-inch sleeping surface. A bed that claims large and measures 40 inches is a lie with a price tag.
The gear you need before you start
You need two layers, and they do different jobs. The liner handles the mess. The bed handles the body. Skip either one and you are cleaning something you did not have to clean.
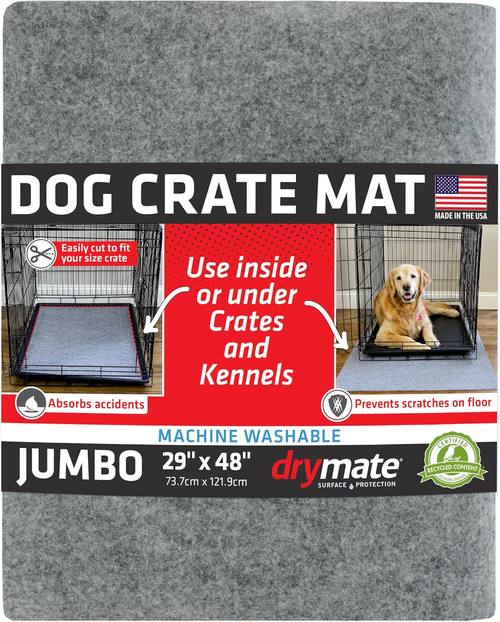
The floor layer: Drymate Dog Crate Mat Liner, Absorbs Urine, Waterproof, Non-Slip, Washable Puppy Pee Pad for Kennel Training - Use Under Pet Cage to Protect Floors, Thin Cut to Fit Design (USA Made) (LGrey)(29"x48")
 Visit on Amazon →
This is the layer that saves your floor. It is a thin mat with a waterproof backing and an absorbent top, and it goes under the crate, not inside it. A puppy who pees in the crate pushes urine out the door and onto the floor. A puppy in a pen will pee wherever he happens to be standing. Either way, the mat catches it before it reaches carpet pad or hardwood seams.
The cut-to-fit design is the part I actually care about. It comes at 29 by 48 inches, and you trim it to the footprint of the crate plus about four inches on each side. That margin is what catches the splash. Measure the crate base, add the margin, mark it with a straight edge, cut with heavy shears. Cut long rather than short, because you can always trim again.
The non-slip back matters more than people expect. A liner that slides around under the crate gets bunched into a wad by the third day, and a bunched liner catches urine in the folds instead of holding it flat.
Flaws but not dealbreakers: It is thin. That is the point. Under a crate or under a food bowl it is exactly right, and if you want padding, that is the bed's job, not the liner's.
Lab owners house training a puppy, or living with a senior lab who leaks, will use this every single day. It is also the cheapest insurance you can buy for a rental deposit.
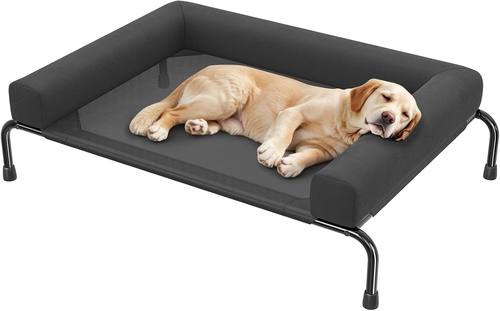
The main bed: Simple Trending Elevated Dog Bed for Large Dogs with Bolsters, Black
 Visit on Amazon →
An elevated bed is the right first bed for a lab for one reason: there is no foam to flatten and no stuffing to eat. The sleeping surface is a taut panel on a frame, and the bolsters give a lab something to lean against when he sprawls. Labs sleep like starfish, flat out with legs everywhere, and a raised cot gives them the full footprint instead of the curled donut shape they will never use.
The height does two jobs. It lifts the dog off a cold floor, which matters for a senior lab's hips, and it keeps air moving underneath, which matters in an Ohio summer. The bolsters are the detail that turns a cot into a bed. A lab leans his chin on them, and a senior lab uses them to push himself up in the morning, which is the difference between a stiff walk and a normal one.
One caution, and I give it to every lab owner: an elevated bed is not chew proof. The frame and the panel are tougher than plush fabric, but a bored two-year-old lab will test the corners. If your lab is under three, this bed goes in the room with you, not out in the yard alone.
Flaws but not dealbreakers: The bolsters are not orthopedic foam, so this is a comfort and airflow bed, not a joint bed. If your lab already limps in the morning, the vet conversation comes before the shopping cart.
Anyone with a lab who sprawls, runs hot, or needs to get off a hard floor will get more out of this than out of any plush bed at twice the money.
The actual setup, step by step
Step one: measure the dog, not the label. Nose to tail, then add 12 inches. Duke is 38 inches, so he needs roughly a 50-inch surface. Penny is 33 inches, so a 45-inch surface works for her. Write the number down before you shop. This habit has saved me more money than any return policy.
Step two: measure the crate footprint. Length times width of the crate base, plus four inches on each side. That is the size you need from the liner.
Step three: cut the liner to fit. Lay it flat, mark your cuts with a marker and a straight edge, and cut with heavy shears. Trim it a little long rather than short.
Step four: liner down first, crate on top. The liner goes under the crate legs, not inside the crate. Inside the crate you want a flat, boring surface, because anything soft and shreddable is a chew project waiting to happen.
Step five: place the bed where the family actually sits. A lab wants to be in the room with you, not in a hallway. Put the bed against a wall, out of the traffic path, with a clear line of sight to the kitchen. That is where Duke spends most of his day.
Step six: make the bed boring and the chew toy interesting. This is the trainer part. When the puppy mouths the frame, redirect him to a toy and praise the toy. Do it 20 times in a row without getting annoyed. A puppy is not chewing to be bad. He is chewing because chewing is what puppies do, and your job is to make the wrong choice dull and the right choice rewarding.
Step seven: supervise the first two weeks. In my house, a new cot earns free access after two weeks with no chewing. A puppy under a year does not get free access at all. He gets supervised time on the bed and crate time when you leave.
Step eight: set a wash schedule and keep it. The liner goes in the wash weekly during house training, and immediately after any accident. The bed panel gets wiped down and aired out. If you wait until it smells, you waited too long.
The mistakes that cost me money
I have made every one of these, so you do not have to.
Buying the plush bed first. Every lab owner does it once. Plush beds are for dogs who do not chew, and a lab puppy chews. You will vacuum foam for a week, then buy a second bed. That is the cheap-bed mistake, and it is the most expensive lesson in this article.
Trusting the word large. A large bed that fits a 40-pound dog is not a large bed. Measure, then buy.
Skipping the floor layer. A crate without a liner means urine wicks into the floor or the carpet pad, and you will smell it for months.
Washing on hot and drying on high. Heat kills waterproof backing and zippers. Cold wash, air dry, and the liner lasts for years.
Giving a puppy free run of an expensive bed. A bed is not a chew toy, but a puppy does not know the difference yet. Crate him when you leave until he is past the shark phase.
What this setup costs over two years
The honest way to compare beds is cost per day: what you paid divided by how many days it survived. A cheap bed that dies in four months costs more per day than a good bed that lasts three years. That is arithmetic, not opinion.
The two items here are the ones I would buy first, because they solve the two problems that show up in week one. The elevated bed has no foam to flatten, so its clock runs on the frame and the panel. The liner is a flat piece of fabric with no zipper to break and no stuffing to pull out. Neither one has a failure point that a lab can destroy in an afternoon.
Check current Amazon price on both and run the math yourself. Two years is the number I use, because that is my minimum for calling a bed a bed.
The bottom line
Set the station up in this order: liner, crate, bed, then training. The liner protects the floor, the crate protects the puppy while you are gone, and the elevated bed gives him a place to sprawl that will not turn into a pancake in six months.
Do the measuring before you order. Do the redirecting before you get frustrated. A lab with a boring crate, a raised bed, and a job to do will leave your furniture alone, most of the time.